The Grinch may have stolen Christmas but these cookies will steal your hearts! Fun & Festive Grinch Thumbprint Cookies made with green chocolate filling & topped with a red heart sprinkle!
Find your inner holiday spirit with these Grinch thumbprint cookies. Made from scratch with only a few ingredients and steps, this is one easy thumbprint cookies recipe you are going to adore. Bring it out for the Christmas parties or share them with friends in a cookie exchange and watch how fast they help spread the spirit of Christmas.

What are Grinch Christmas Cookies?
The Grinch is a very popular and famous green character from the town of Whoville. He was the main character in the children’s book “How the Grinch Stole Christmas” written by Dr. Seuss. These green Christmas cookies are meant to remind you of the iconic red and green colors used in the book as well as the Grinch’s heart, which grew 3 sizes that day.
Grinch Cookies Ingredients:
-Flour: You will need 2 cups of all-purpose flour for the base of these cookies.
-Candy melts: Use a 12-ounce bag of neon green-colored candy melts for a festive center in every cookie.
-Butter: You will need 1 cup of room temperature butter, this is two sticks.
-Sugar: Add in ⅔ cups of granulated sugar for a sweeter cookie.

-Eggs: You will need 2 egg yolks for the dough because they help to bind everything together while adding in a richer flavor.
-Vanilla: Use one whole tablespoon of vanilla extract for a flavorful cookie. Stronger vanillas will have an even better flavor, but use what you have on hand.
-Coconut oil: You will need 1 tablespoon of coconut oil to help melt down the candy melts into a smooth finish.
-Salt: Adding ½ teaspoon of salt into the cookie dough will help to enhance the flavors.
-Heart sprinkles: Use large red heart sprinkles to make these cookies look festive and fun.
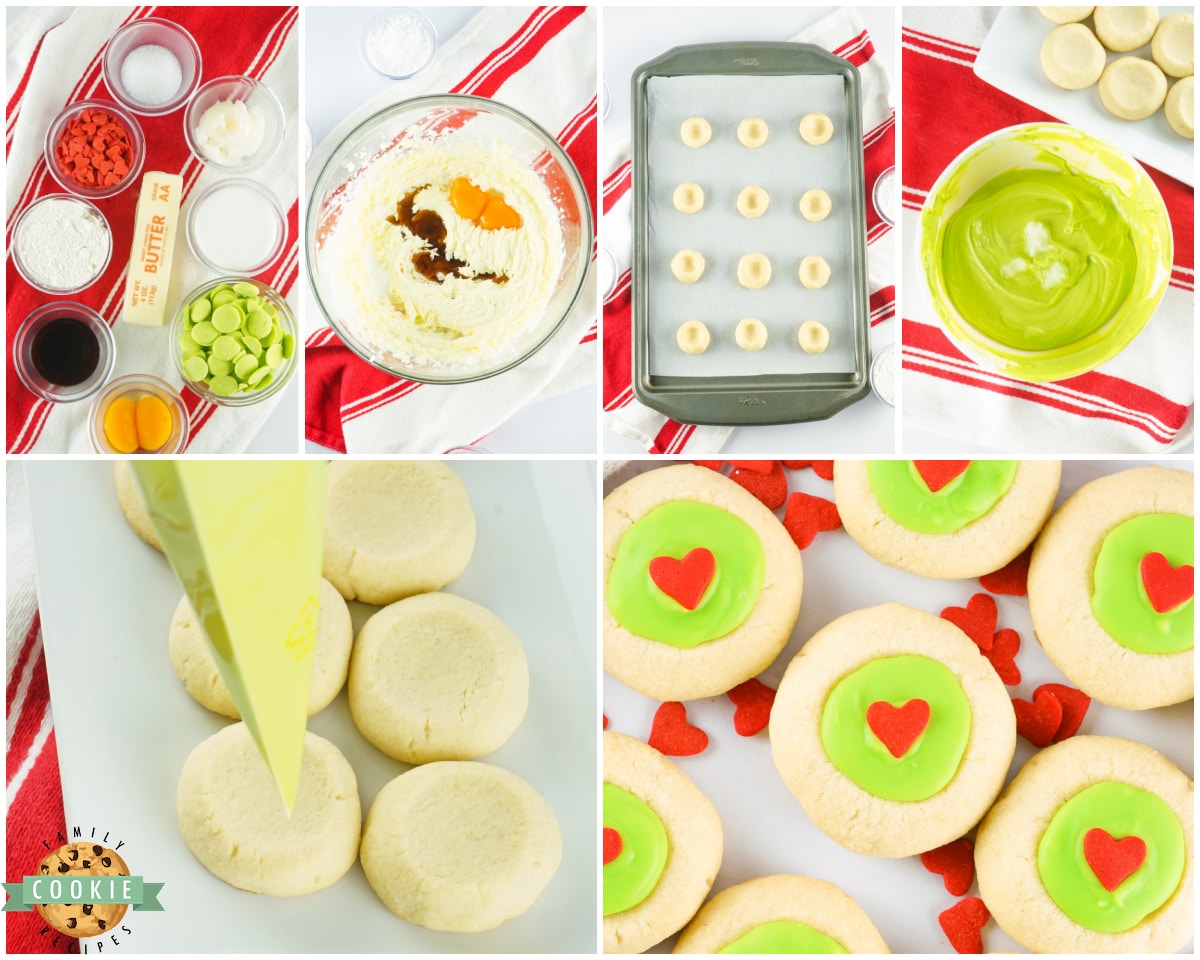
How to make Grinch Thumbprint Cookies
Preheat your oven to 350 degrees F and line a baking sheet with parchment paper. Set aside.
In a large mixing bowl cream the butter and sugar together with an electric hand mixer.
Beat for one minute and then add in the eggs, salt and vanilla, beat again for another minute to combine.
Add in the flour and continue to use the mixer until the dough becomes crumbly. Switch to kneading by hand until the dough forms a ball.
Shape the Dough
Roll the dough out into a ½ inch sized ball with 1 tablespoon of dough. You can also make the cookie up to 2 tablespoons in size. Just note that you might need to cook them longer.
Line your cookie balls on the baking sheet, leaving at least half an inch between them all.
Use your thumb or the back of a ¼ teaspoon to make an indent in the center of each dough ball. If you’re having trouble with your cookies cracking as you make the thumbprints, reroll them to make the outside of the ball moist again and then retry the divet.

Bake the Dough
Bake in the oven for 8 to 10 minutes or until the cookies are a light golden brown on the bottom. Allow the cookie to cool completely on the baking sheet.
Place your candy melts into a medium-sized mixing bowl and place in the microwave for about 3 minutes or until smooth and creamy, stirring after every 30 seconds.
Add the coconut oil into the chocolate and stir well to combine. If your chocolate is pretty thick and “gloppy” add more coconut oil a little bit at a time until the desired consistency is met.
Place your melted chocolate into a frosting bag and snip the tip off with scissors, making sure not to cut the tip too large or it will come out on its own and make it hard to decorate the cookies without making a mess.

Fill the cookies
Fill each cookie cavity with the chocolate by filling it in a circular pattern in the middle of the cookie and working your way out to the edge of the indent. Don’t try to adjust the chocolate once it’s set on the cookies for 60 seconds or longer. If not, they won’t be smooth and they’ll look messy. I learned this the hard way.
Give each cookie a light tap to ensure that the chocolate flattens out and is smooth. When adding the chocolate to the cookies, if you want/need to adjust the chocolate a bit, use a toothpick as you’re decorating, but don’t try to change it after it’s set, as stated above.
Add the Grinch Heart!
Immediately place a red heart sprinkle in the middle of the chocolate. Don’t push the heart sprinkles into the chocolate, just placing them on the cookie will make them stick once hardened.
Chill for about 5 minutes or until the chocolate is set and has hardened. Enjoy!
How long are chocolate filled thumbprint cookies good for?
These cookies can be stored in an airtight container for up to 5 days but can be frozen for up to 3 months. If you opt to freeze them, note that the chocolate may sweat as the cookies thaw and this could cause the sprinkle’s color to bleed a little onto the cookie.
How do I keep my thumbprint cookies from spreading?
Make sure to use parchment paper or a silicone baking mat on your baking sheets as this is a nice nonstick surface. Using nonstick cooking grease or butter will add moisture to the cookies and can cause them to spread as they bake.

Need More Christmas Cookie Ideas? Check Out The BEST CHRISTMAS COOKIE RECIPES We Have
- CHRISTMAS CUT OUT COOKIES
- HOLIDAY STAR COOKIES
- SPICED CHRISTMAS SHORTBREAD COOKIES
- CRUNCHY WHITE CHOCOLATE CINNAMON COOKIES
- CHRISTMAS SUGAR COOKIE BARS
- HOLIDAY SPICED SNICKERDOODLES
- CHRISTMAS SPRINKLE COOKIES
- CHOCOLATE PEPPERMINT COOKIES
- CHRISTMAS SUGAR COOKIE RECIPE
- CAKE MIX PEANUT BUTTER BLOSSOMS
- MINT CHRISTMAS COOKIES
- CHOCOLATE PEPPERMINT BLOSSOMS
- MINI SUGAR COOKIE BITES
- PEPPERMINT VANILLA SHORTBREAD COOKIES

I remember this day clearly! My older 3 kids were all at school and I had nothing on the schedule. It was amazing! We went to the park, even though there was snow on the ground, and I remember thinking how EASY it was to just be at the park with 2 kids. HA! Cuties, right?! The boy on the right is 2 years younger than the girl on the left. He already looks taller than her!

You’re going to love this Grinch cookies recipe! It’s a perfectly colorful treat for the holidays and brings so much spirit and joy to every bite.













Jess says
These are the cutest cookies and I will definitely have to make them for my roommate!
Brandy says
Such a fun spin on a classic cookie. So tasty and festive. They make a great addition to the holiday cookie rotation